Direct Midi Between Two iOS Devices: Difference between revisions
m (Michael moved page Direct Midi Between Two Ios Devices to Direct Midi Between Two iOS Devices) |
m (add bluetooth midi section) |
||
| (2 intermediate revisions by 2 users not shown) | |||
| Line 1: | Line 1: | ||
[[Category:Tips and Tricks]] | |||
There are a few ways to send MIDI between iOS devices. This article discusses two methods: MIDI over USB and MIDI over Bluetooth. | |||
== Wired MIDI == | |||
It is possible to establish a wired MIDI connection between two iOS/iPadOS devices with a regular charging cable and a USB hub. This is not Loopy specific and seems not to be well-known. All you need is a USB hub connected to one of the devices (which will require the Apple USB Camera adapter/CCK on Lightning-equipped devices) and the normal USB charging cable for the other. | It is possible to establish a wired MIDI connection between two iOS/iPadOS devices with a regular charging cable and a USB hub. This is not Loopy specific and seems not to be well-known. All you need is a USB hub connected to one of the devices (which will require the Apple USB Camera adapter/CCK on Lightning-equipped devices) and the normal USB charging cable for the other. | ||
| Line 8: | Line 11: | ||
* Plug in your USB hub (and any required adapters) to one device | * Plug in your USB hub (and any required adapters) to one device | ||
* Connect the other device's charging cable to the USB hub. Note that this device will probably not be able to charge while it is connected this way. | * Connect the other device's charging cable to the USB hub. Note that this device will probably not be able to charge while it is connected this way. | ||
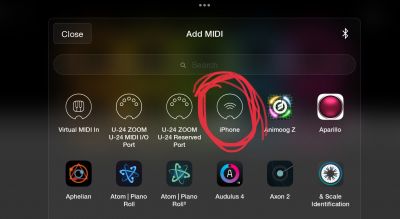
* On the device that will receive MIDI, use the Add Midi button on the mixer page to add a MIDI source. The other device should appear as a MIDI source. Choose it.[[File | * On the device that will receive MIDI, use the Add Midi button on the mixer page to add a MIDI source. The other device should appear as a MIDI source. Choose it.</br>[[File:01_addmidi_iphone_img_4723.jpg|400px]] | ||
* On the sending device there are a couple of options for how to set up the MIDI sending. The other device will be available as a MIDI target. You can select the other device as the target for MIDI send actions. OR, you can send the output to Virtual MIDI Out and use the free midimittr app. Details on using midimttr below. | * On the sending device there are a couple of options for how to set up the MIDI sending. The other device will be available as a MIDI target. You can select the other device as the target for MIDI send actions. OR, you can send the output to Virtual MIDI Out and use the free midimittr app. Details on using midimttr below. | ||
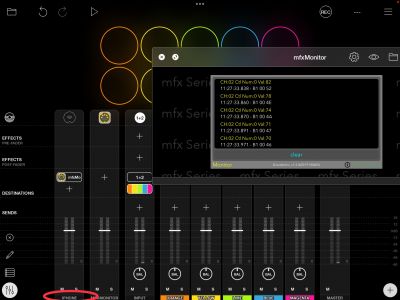
When first setting this up, it is advisable to use a MIDI monitor (the free mfx Monitor is shown in the picture) to confirm that MIDI is being received. | When first setting this up, it is advisable to use a MIDI monitor (the free mfx Monitor is shown in the picture) to confirm that MIDI is being received. | ||
[[File | [[File:02_mixer_configured_monitor_img_4724.jpg|400px]] | ||
= To Use MidiMttr = | |||
To use midimttr to act as a go-between: | To use midimttr to act as a go-between: | ||
* launch midimttr | * launch midimttr | ||
| Line 21: | Line 24: | ||
* if this is the first time setting up a USB connection, tap on the gear wheel icon on the upper-right of the screen. The system settings will be opened. Make sure USB connectivity is turned on. | * if this is the first time setting up a USB connection, tap on the gear wheel icon on the upper-right of the screen. The system settings will be opened. Make sure USB connectivity is turned on. | ||
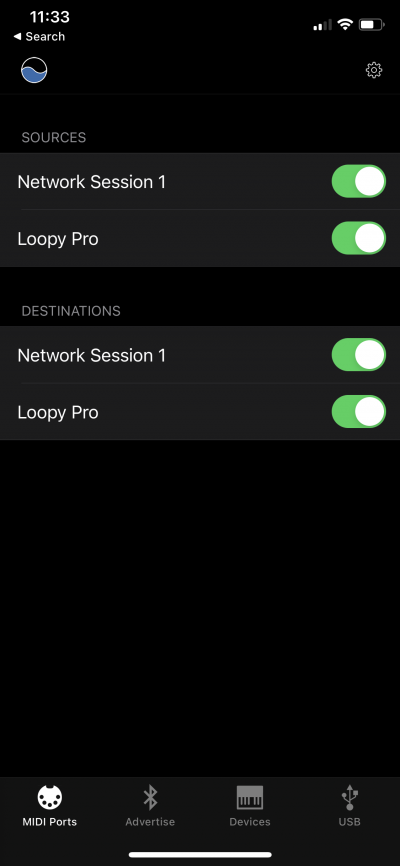
[[File | [[File:midimttr_setup_img_3950.png|400px|midimttr set up and ready to go.]] | ||
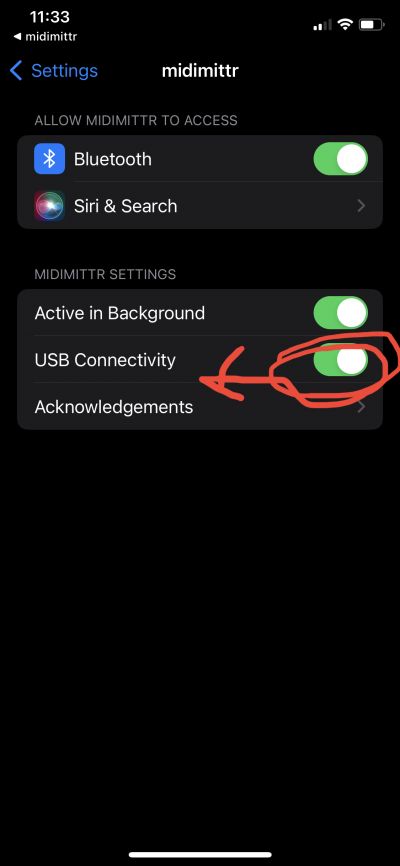
[[File | [[File:midimttr_setup2_img_3951.jpg|400px|USB Connectivity Enabled]] | ||
NOTE: If you go to midimttr's USB tab, it will show DISCONNECTED even when things are set up correctly. You can ignore this. | NOTE: If you go to midimttr's USB tab, it will show DISCONNECTED even when things are set up correctly. You can ignore this. | ||
== Bluetooth MIDI == | |||
Bluetooth MIDI is relatively low latency and is easy to setup via Loopy Pro's Bluetooth connections panel. To use this technique, make sure that you have granted Loopy Pro Bluetooth access. Normally, Loopy Pro will ask you for permission the first time that you try to access Bluetooth. You can change this permission in the iOS Settings app. | |||
On one device, choose Bluetooth Devices from Loopy Pro's main menu. Tap on the Advertising tab. Turn on the option ''Advertise MIDI Service.'' Tap Done. | |||
On the other device, choose Bluetooth Device from Loopy Pro's main menu. The other device will show up in the list of Bluetooth devices. Connect to it. | |||
That's all there is to it. | |||
Latest revision as of 05:51, 29 September 2024
There are a few ways to send MIDI between iOS devices. This article discusses two methods: MIDI over USB and MIDI over Bluetooth.
Wired MIDI
It is possible to establish a wired MIDI connection between two iOS/iPadOS devices with a regular charging cable and a USB hub. This is not Loopy specific and seems not to be well-known. All you need is a USB hub connected to one of the devices (which will require the Apple USB Camera adapter/CCK on Lightning-equipped devices) and the normal USB charging cable for the other.
Set this up by doing the following.
- Turn on Enable Network MIDI in Loopy Pro's system settings on both devices.
- Plug in your USB hub (and any required adapters) to one device
- Connect the other device's charging cable to the USB hub. Note that this device will probably not be able to charge while it is connected this way.
- On the device that will receive MIDI, use the Add Midi button on the mixer page to add a MIDI source. The other device should appear as a MIDI source. Choose it.

- On the sending device there are a couple of options for how to set up the MIDI sending. The other device will be available as a MIDI target. You can select the other device as the target for MIDI send actions. OR, you can send the output to Virtual MIDI Out and use the free midimittr app. Details on using midimttr below.
When first setting this up, it is advisable to use a MIDI monitor (the free mfx Monitor is shown in the picture) to confirm that MIDI is being received.
To Use MidiMttr
To use midimttr to act as a go-between:
- launch midimttr
- make sure that Loopy Pro and Network Session are enabled on the MIDI Ports tab
- if this is the first time setting up a USB connection, tap on the gear wheel icon on the upper-right of the screen. The system settings will be opened. Make sure USB connectivity is turned on.
NOTE: If you go to midimttr's USB tab, it will show DISCONNECTED even when things are set up correctly. You can ignore this.
Bluetooth MIDI
Bluetooth MIDI is relatively low latency and is easy to setup via Loopy Pro's Bluetooth connections panel. To use this technique, make sure that you have granted Loopy Pro Bluetooth access. Normally, Loopy Pro will ask you for permission the first time that you try to access Bluetooth. You can change this permission in the iOS Settings app.
On one device, choose Bluetooth Devices from Loopy Pro's main menu. Tap on the Advertising tab. Turn on the option Advertise MIDI Service. Tap Done.
On the other device, choose Bluetooth Device from Loopy Pro's main menu. The other device will show up in the list of Bluetooth devices. Connect to it.
That's all there is to it.


