MIDI Essential Tips and Tricks: Difference between revisions
No edit summary |
m tags |
||
| (3 intermediate revisions by the same user not shown) | |||
| Line 1: | Line 1: | ||
[[Category:Tips and Tricks]] | [[Category:Tips and Tricks]][[Category:Basics]] | ||
This article covers a variety of tips for using MIDI in Loopy Pro. | This article covers a variety of tips for using MIDI in Loopy Pro. | ||
| Line 27: | Line 27: | ||
== Triggering MIDI Bindings with Widgets == | == Triggering MIDI Bindings with Widgets == | ||
It is often useful to be able to send MIDI from | It is often useful to use widgets to trigger MIDI bindings. To do so. a widget needs to be able to send MIDI that reaches Loopy Pro's MIDI control system. As of Loopy Pro 2.0, there are two primary ways to do this: | ||
* Use a lightweight MIDI AUv3 (such as the free Streambyter or ShowMIDI plugins) to pass MIDI from widgets to the Loopy Pro's MIDI control system. | |||
* Use a MIDI Color to pass the MIDI through to the MIDI control system. | |||
=== AUv3 Passthrough to MIDI Control === | |||
The simplest way to do this is to use a MIDI AUv3 as an intermediary. Loopy Pro can use MIDI from any loaded AUv3 to trigger MIDI Bindings. To do this: | |||
* Add a MIDI AUv3 to your project that passes MIDI through. Streambyter or ShowMIDI (both free AUv3) work well for this. | * Add a MIDI AUv3 to your project that passes MIDI through. Streambyter or ShowMIDI (both free AUv3) work well for this. | ||
| Line 36: | Line 42: | ||
[[File:Fader to Streambyter.jpg|alt=A fader set up to send MIDI CC 0 to Streambyter so that it can be received by MIDI Bindings|none|thumb|A fader set up to send MIDI CC 0 to Streambyter so that it can be received by MIDI Bindings]] | [[File:Fader to Streambyter.jpg|alt=A fader set up to send MIDI CC 0 to Streambyter so that it can be received by MIDI Bindings|none|thumb|A fader set up to send MIDI CC 0 to Streambyter so that it can be received by MIDI Bindings]] | ||
[[File:Streambyter binding.jpg|alt=A MIDI Binding set up to be triggered by Streambyter. This binding will trigger when the fader shown in the previous picture is moved.|none|thumb|A MIDI Binding set up to be triggered by Streambyter. This binding will trigger when the fader shown in the previous picture is moved.]] | [[File:Streambyter binding.jpg|alt=A MIDI Binding set up to be triggered by Streambyter. This binding will trigger when the fader shown in the previous picture is moved.|none|thumb|A MIDI Binding set up to be triggered by Streambyter. This binding will trigger when the fader shown in the previous picture is moved.]] | ||
=== Using a MIDI Color for Passthrough to MIDI Control === | |||
The Send MIDI Message action can send MIDI to a MIDI colour. Make sure that ''Monitor Through'' is turned on in the Send MIDI Message action. The MIDI message can then be used for MIDI bindings. Usually, you will see a MIDI color used for no other purpose than automation and passing messages. You will need to add a MIDI loop or one-shot to the project for the color to be available. Typically, you won't use that clip and will hide it on a page other than the project's main page. The video below demonstrates the setup: | |||
<youtube>l9BA5FMw5zE</youtube> | |||
== Sending Keys and Pads to Different Instruments == | == Sending Keys and Pads to Different Instruments == | ||
| Line 49: | Line 60: | ||
** Set the Channel Filter to the MIDI Channel of the source (either the keys' MIDI Channel or the pads') | ** Set the Channel Filter to the MIDI Channel of the source (either the keys' MIDI Channel or the pads') | ||
** [[File:MIDI Destination Options.jpg|alt=The Channel Filter set to MIDI Channel 1|none|thumb|The Channel Filter set to MIDI Channel 1]] | ** [[File:MIDI Destination Options.jpg|alt=The Channel Filter set to MIDI Channel 1|none|thumb|The Channel Filter set to MIDI Channel 1]] | ||
== Using a passthrough plugin as a MIDI bus == | |||
Sometimes, you may want multiple MIDI sources to be seen as a single MIDI source so that input from any of them is routed to the same destinations. For instance, you might want an external MIDI keyboard, Launchpad and onscreen keyboard to be routed the same way. | |||
To do this, add a MIDI AUv3 that passes MIDI through automatically. Streambyter and ShowMIDI are free lightweight AUv3 plugins that pass through any MIDI they receive with no detectable latency. Make the passthrough AUv3 the destination of your other MIDI controllers. Use the passthrough as the MIDI source as shown in the picture below. | |||
Note that Streambyter can also be used as a powerful MIDI scripting, filtering and remapping utility in addition to being a handy MIDI monitor. | |||
There are likely other MIDI AUv3 that also can be used. | |||
[[File:VirtualMIDIbus.jpg|alt=A virtual MIDI bus set up in Loopy Pro’s mixer|none|thumb]] | |||
== Synth Routing == | |||
See [[Synth Routing 2.0]] for ideas about setting up a routing switch for your synths. | |||
Latest revision as of 04:59, 24 May 2026
This article covers a variety of tips for using MIDI in Loopy Pro.
MIDI Effect Chains
MIDI Effects chains are possible in Loopy Pro by adding MIDI AUv3s to the mixer and chaining them together using the mixer destination slots.

Steps:
- Add each MIDI AUv3 that will be in your chain to Loopy Pro's mixer, by tapping the + in Loopy Pro's mixer and choosing Add MIDI
- Tap in the Destination slot of the mixer to choose where each plug will send its MIDI.
Audio Instruments and Effects as MIDI Sources
Some Audio AUv3 instruments and effects can send MIDI. For example, Animoog Z can send MIDI from its onscreen keyboard. The FAC Envolver audio effect can send MIDI in response to audio input. MIDI Guitar 2 and 3 con convert audio input into MIDI.
To use the MIDI output of audio AU instruments or effects, first load the audio AUv3. Here we have Animoog Z loaded as an instrument.

Once the AUv3 has been loaded as an audio source (instrument or effect), open the mixer and tap + to add a channel to the mixer.
Choose Add MIDI.

In the MIDI Source popup that appears instances of Audio Units already in the project will be labeled with a letter. Choose an existing instance.

The AU you choose will be added as a MIDI source to your mixer and can now be routed to any destination that can receive MIDI.

Triggering MIDI Bindings with Widgets
It is often useful to use widgets to trigger MIDI bindings. To do so. a widget needs to be able to send MIDI that reaches Loopy Pro's MIDI control system. As of Loopy Pro 2.0, there are two primary ways to do this:
- Use a lightweight MIDI AUv3 (such as the free Streambyter or ShowMIDI plugins) to pass MIDI from widgets to the Loopy Pro's MIDI control system.
- Use a MIDI Color to pass the MIDI through to the MIDI control system.
AUv3 Passthrough to MIDI Control
The simplest way to do this is to use a MIDI AUv3 as an intermediary. Loopy Pro can use MIDI from any loaded AUv3 to trigger MIDI Bindings. To do this:
- Add a MIDI AUv3 to your project that passes MIDI through. Streambyter or ShowMIDI (both free AUv3) work well for this.
- Use the Send MIDI Message action to send MIDI from widgets to the intermediary of your choice.
- Set up your MIDI binding and set the intermediary as the trigger source.


Using a MIDI Color for Passthrough to MIDI Control
The Send MIDI Message action can send MIDI to a MIDI colour. Make sure that Monitor Through is turned on in the Send MIDI Message action. The MIDI message can then be used for MIDI bindings. Usually, you will see a MIDI color used for no other purpose than automation and passing messages. You will need to add a MIDI loop or one-shot to the project for the color to be available. Typically, you won't use that clip and will hide it on a page other than the project's main page. The video below demonstrates the setup:
Sending Keys and Pads to Different Instruments
If you have a controller with keys and pads, you may want to send the keys and pads to different synths.
Steps:
- Use a MIDI monitor to determine which MIDI channel the keys and pads send on. Typically, the keys will send on channel 1 and the pads on channel 10.
- Add your controller to Loopy Pro's mixer if you have not already done so.
- Add the instruments to which you want to send the MIDI as destinations of the controller.
- For each instrument
- Tap on it destination icon to show the destination options
- Set the Channel Filter to the MIDI Channel of the source (either the keys' MIDI Channel or the pads')
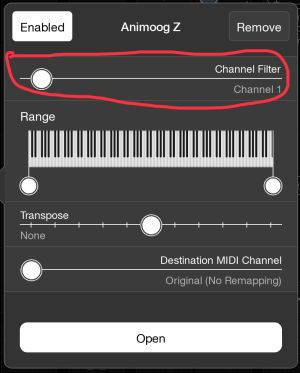
The Channel Filter set to MIDI Channel 1

Using a passthrough plugin as a MIDI bus
Sometimes, you may want multiple MIDI sources to be seen as a single MIDI source so that input from any of them is routed to the same destinations. For instance, you might want an external MIDI keyboard, Launchpad and onscreen keyboard to be routed the same way.
To do this, add a MIDI AUv3 that passes MIDI through automatically. Streambyter and ShowMIDI are free lightweight AUv3 plugins that pass through any MIDI they receive with no detectable latency. Make the passthrough AUv3 the destination of your other MIDI controllers. Use the passthrough as the MIDI source as shown in the picture below.
Note that Streambyter can also be used as a powerful MIDI scripting, filtering and remapping utility in addition to being a handy MIDI monitor.
There are likely other MIDI AUv3 that also can be used.

Synth Routing
See Synth Routing 2.0 for ideas about setting up a routing switch for your synths.