Getting Started With MIDI Learn: Difference between revisions
mNo edit summary |
m tags |
||
| (10 intermediate revisions by the same user not shown) | |||
| Line 1: | Line 1: | ||
[[Category:Hardware Integration]] | [[Category:Hardware Integration]] | ||
[[Category:Basics]] | |||
[[Category:Getting Started]] | |||
This article is a quick reference outlining getting up and running with MIDI Learn. You may want to read the manual's [https://loopypro.com/manual/#midi-learn MIDI Learn section]. For more depth, you may want to dig into the many tutorials found on YouTube. There are links to some popular series on the [[Tutorials]] page. | This article is a quick reference outlining getting up and running with MIDI Learn. You may want to read the manual's [https://loopypro.com/manual/#midi-learn MIDI Learn section]. For more depth, you may want to dig into the many tutorials found on YouTube. There are links to some popular series on the [[Tutorials]] page. | ||
| Line 7: | Line 9: | ||
= MIDI Learn = | = MIDI Learn = | ||
The MIDI Learn system is a quick way to map | The MIDI Learn system is a quick way to map MIDI messages or typing keyboard keystrokes to an on-screen layout element: clip, button, slider, etc. It can also be a quicker way than using the profile editor in Control Settings to manually set up a binding. | ||
== MIDI Learn user interface elements == | |||
* Connect the MIDI device that you want to use to trigger things in Loopy Pro. If it is a Bluetooth MIDI device, choose Bluetooth Devices from the main menu to make sure that your device is connected. | * Connect the MIDI device that you want to use to trigger things in Loopy Pro. If it is a Bluetooth MIDI device, choose Bluetooth Devices from the main menu to make sure that your device is connected. | ||
* Choose MIDI Learn from the main menu | * Choose MIDI Learn from the main menu | ||
* | * ''Optional'': Choose a profile to learn into from the popup at the upper-left of the screen. For on-screen objects, do not use a global profile.[[File:Midi learn profile selector.jpg.png|alt=Profile selector popup|none|thumb|200x200px|Profile selector popup menu.]] | ||
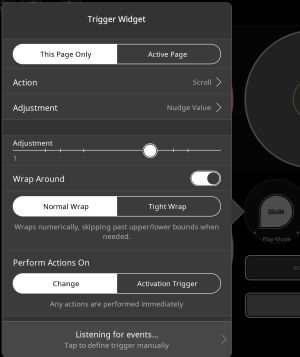
* Tap on | * Tap on the user interface element that you want to trigger or control with MIDI. This will pop up the MIDI Learn panel. The upper portion of the window has the options for the action being learned.. The lower part of the panel displays the MIDI message once it has been learned. [[File:MIDI Learn Trigger Widget.jpg|none|thumb]] | ||
* Touch the control on your MIDI device that you want to control/trigger the user interface element | * Touch the control on your MIDI device that you want to control/trigger the user interface element.[[File:Midi learn trigger widget after.jpg|none|thumb|After learning a MIDI message, the learned message is displayed. Tap on the lower panel, to edit the message or its options. Tap on New at the top of the panel to learn another action for this object.]] | ||
* | * ''Optional'': make adjustments to the learned event. The MIDI Learn panel has an upper region with options for the type of element you are controlling. The bottom part displays information about the message. Tapping on it provides some options related to interpretation of the incoming message such as whether to use On or Off as a trigger or Hold or Double-tap and more advanced options. | ||
* | * ''Optional'': refine or add to the binding in Loopy Pro's Control Settings. MIDI Learn creates a binding in Control Settings that can trigger a series of actions rather than just a single one. | ||
<youtube>RjqLYRPA4pg</youtube> | |||
== MIDI Learn Plugin Elements == | |||
You can MIDI Learn an AUv3 plugin's parameters and actions that control it (open and close its window, enable and disable it, and more). Learn more about mapping plugin parameters [[MIDI Map AUv3 Parameters|here]]. | |||
If the plug-in is visible in the mixer when in MIDI Learn mode, tap on the plugin's icon to bring up a popup menu of the learnable actions: | |||
[[File:Midi learn plugin actions.jpg|none|thumb]] | |||
If the plugins window is open, there will be an added knob that is used to access the learnable actions. Tap on the knob to pop up a list of learnable actions. '''''To learn a parameter via an onscreen control''''', interact with a user-interface element in the plugin's window. If it is tied to a learnable parameter, the knob will blink. Tap on the knob to learn that parameter. | |||
{| | |||
|[[File:MIDI Learn plugin window.jpg|alt=MIDI Learn plugin window|none|thumb|400x320px]] | |||
|<YouTube width="400">gh1x2QFL-3A</YouTube> | |||
|} | |||
== Using MIDI Learn to Manually Set Up A Binding == | |||
Sometimes, it is more convenient to enter the MIDI triggering information by hand than to learn it from the MIDI source. This is especially true when a MIDI plugin or Loopy Pro widget is the MIDI Source. To to this: | |||
* Enter MIDI Learn mode | |||
* Tap on the element that you want to control | |||
* Tap in the lower part of the MIDI Learn panel, where it says ''Listening for events'' | |||
* Choose the MIDI source from the ''Devices'' list (which will include any plugins that send MIDI) | |||
* Enter the MIDI Message information. | |||
<youtube>-TquxvPbwmU</YouTube> | |||
= Bindings = | = Bindings = | ||
[https://loopypro.com/manual/#adding-bindings-manually Bindings] are mappings of | [[File:Control Settings Profile Bindings.jpg|alt=MIDI Bindings in a project profile|thumb|The bindings in a profile call Session General]] | ||
[https://loopypro.com/manual/#adding-bindings-manually Bindings] are mappings of triggers (MIDI messages or typing keyboard keypresses to Loopy Pro actions. A binding can trigger a single action or a series of actions. When you MIDI Learn, Loopy Pro creates a binding that is stored in a ''profile'' that you can access via the [https://loopypro.com/manual/#control-settings-section Control Settings] menu. You can edit the bindings to refine them or add or delete additional actions. | |||
To view the bindings, choose ''Control Settings'' and look in the available profiles. | |||
'''More about actions and action sequences''': See [[Actions Tips]] and Loopy Pro manual's [https://loopypro.com/manual/#actions-intro the actions sections] | '''More about actions and action sequences''': See [[Actions Tips]] and Loopy Pro manual's [https://loopypro.com/manual/#actions-intro the actions sections] | ||
= Control Profiles = | = Control Profiles = | ||
MIDI Bindings | [[File:Control Settings Profile list.jpg|alt=Profiles list in control settings|thumb]] | ||
MIDI Bindings are stored in profiles accessible via the main menu's ''Control Settings'' command. Project profiles are stored in the project itself and apply only to that project. You should generally create bindings here for onscreen elements. Global Profiles are bindings available to all projects. These generally should not be bindings to onscreen objects. | |||
Profiles can be activated and deactivated in the Control Settings panel using the check "box" next to the profile name. | Profiles can be activated and deactivated in the Control Settings panel using the check "box" next to the profile name. | ||
| Line 40: | Line 64: | ||
= Footswitch Note = | = Footswitch Note = | ||
Pretty much any footswitch can be used with Loopy Pro. For the best MIDI Learn experience, a footswitch should be set up to send an ON message (cc value 127 or note velocity 127) when pressed and an OFF message (CC value 0 or note velocity 0) when released. Other setups can work but may need manual editing of the learned event. For instance, if a footswitch only sends an ON message, Loopy Pro will interpret that as a HOLD. You can manually reassign that to ON. See [[MIDI Troubleshooting]] for more information about footswitch setup. | Pretty much any [[Footswitches|footswitch]] can be used with Loopy Pro. For the best MIDI Learn experience, a footswitch should be set up to send an ON message (cc value 127 or note velocity 127) when pressed and an OFF message (CC value 0 or note velocity 0) when released. Other setups can work but may need manual editing of the learned event. For instance, if a footswitch only sends an ON message, Loopy Pro will interpret that as a HOLD. You can manually reassign that to ON. | ||
See [[MIDI Troubleshooting]] and [[Footswitches]] for more information about footswitch setup. | |||
Latest revision as of 05:23, 1 January 2026
This article is a quick reference outlining getting up and running with MIDI Learn. You may want to read the manual's MIDI Learn section. For more depth, you may want to dig into the many tutorials found on YouTube. There are links to some popular series on the Tutorials page.
What can you control via MIDI? Pretty much everything you can touch on the screen can be MIDI Learned and you can manually set up series of actions to be triggered by MIDI.
MIDI Learn
The MIDI Learn system is a quick way to map MIDI messages or typing keyboard keystrokes to an on-screen layout element: clip, button, slider, etc. It can also be a quicker way than using the profile editor in Control Settings to manually set up a binding.
MIDI Learn user interface elements
- Connect the MIDI device that you want to use to trigger things in Loopy Pro. If it is a Bluetooth MIDI device, choose Bluetooth Devices from the main menu to make sure that your device is connected.
- Choose MIDI Learn from the main menu
- Optional: Choose a profile to learn into from the popup at the upper-left of the screen. For on-screen objects, do not use a global profile.
Profile selector popup menu. - Tap on the user interface element that you want to trigger or control with MIDI. This will pop up the MIDI Learn panel. The upper portion of the window has the options for the action being learned.. The lower part of the panel displays the MIDI message once it has been learned.
- Touch the control on your MIDI device that you want to control/trigger the user interface element.
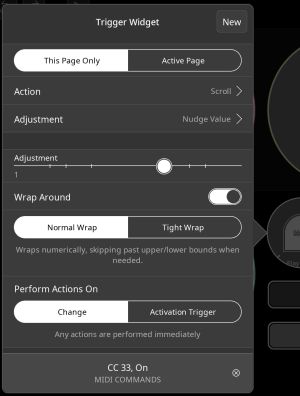
After learning a MIDI message, the learned message is displayed. Tap on the lower panel, to edit the message or its options. Tap on New at the top of the panel to learn another action for this object. - Optional: make adjustments to the learned event. The MIDI Learn panel has an upper region with options for the type of element you are controlling. The bottom part displays information about the message. Tapping on it provides some options related to interpretation of the incoming message such as whether to use On or Off as a trigger or Hold or Double-tap and more advanced options.
- Optional: refine or add to the binding in Loopy Pro's Control Settings. MIDI Learn creates a binding in Control Settings that can trigger a series of actions rather than just a single one.


MIDI Learn Plugin Elements
You can MIDI Learn an AUv3 plugin's parameters and actions that control it (open and close its window, enable and disable it, and more). Learn more about mapping plugin parameters here.
If the plug-in is visible in the mixer when in MIDI Learn mode, tap on the plugin's icon to bring up a popup menu of the learnable actions:

If the plugins window is open, there will be an added knob that is used to access the learnable actions. Tap on the knob to pop up a list of learnable actions. To learn a parameter via an onscreen control, interact with a user-interface element in the plugin's window. If it is tied to a learnable parameter, the knob will blink. Tap on the knob to learn that parameter.
 |
Using MIDI Learn to Manually Set Up A Binding
Sometimes, it is more convenient to enter the MIDI triggering information by hand than to learn it from the MIDI source. This is especially true when a MIDI plugin or Loopy Pro widget is the MIDI Source. To to this:
- Enter MIDI Learn mode
- Tap on the element that you want to control
- Tap in the lower part of the MIDI Learn panel, where it says Listening for events
- Choose the MIDI source from the Devices list (which will include any plugins that send MIDI)
- Enter the MIDI Message information.
Bindings

Bindings are mappings of triggers (MIDI messages or typing keyboard keypresses to Loopy Pro actions. A binding can trigger a single action or a series of actions. When you MIDI Learn, Loopy Pro creates a binding that is stored in a profile that you can access via the Control Settings menu. You can edit the bindings to refine them or add or delete additional actions.
To view the bindings, choose Control Settings and look in the available profiles.
More about actions and action sequences: See Actions Tips and Loopy Pro manual's the actions sections
Control Profiles

MIDI Bindings are stored in profiles accessible via the main menu's Control Settings command. Project profiles are stored in the project itself and apply only to that project. You should generally create bindings here for onscreen elements. Global Profiles are bindings available to all projects. These generally should not be bindings to onscreen objects.
Profiles can be activated and deactivated in the Control Settings panel using the check "box" next to the profile name.
Loopy Pro has actions to activate, deactivate, and switch control profiles.
MIDI Controllers
Any MIDI source visible to Loopy Pro, including AUv3 that send MIDI, can trigger MIDI bindings.
Footswitch Note
Pretty much any footswitch can be used with Loopy Pro. For the best MIDI Learn experience, a footswitch should be set up to send an ON message (cc value 127 or note velocity 127) when pressed and an OFF message (CC value 0 or note velocity 0) when released. Other setups can work but may need manual editing of the learned event. For instance, if a footswitch only sends an ON message, Loopy Pro will interpret that as a HOLD. You can manually reassign that to ON.
See MIDI Troubleshooting and Footswitches for more information about footswitch setup.