Actions Tips: Difference between revisions
m (→Helpful Hints: italics) |
|||
| (5 intermediate revisions by the same user not shown) | |||
| Line 3: | Line 3: | ||
Loopy Pro's actions can provide control over almost every aspect of Loopy Pro and can be used to create custom behavior. Actions are used by the MIDI Learn/MIDI Binding system, widgets (buttons, sliders, dials, etc), gestures and follow action system to control Loopy Pro. | Loopy Pro's actions can provide control over almost every aspect of Loopy Pro and can be used to create custom behavior. Actions are used by the MIDI Learn/MIDI Binding system, widgets (buttons, sliders, dials, etc), gestures and follow action system to control Loopy Pro. | ||
= MIDI Learn = | == MIDI Learn == | ||
When you MIDI Learn in Loopy Pro, you are creating a MIDI Binding to an action which you can also customize or add to. The bindings and their actions are accessed by the Control Settings panel. | When you MIDI Learn in Loopy Pro, you are creating a MIDI Binding to an action which you can also customize or add to. The bindings and their actions are accessed by the Control Settings panel. | ||
= Action Sequences = | == Action Sequences == | ||
Anywhere in Loopy Pro where an action can be used, a series of actions can be used. There will be a "+" icon you can tap to add more actions. For example, if you MIDI Learn Play/Stop for a clip, you can go into Control Settings and find the MIDI binding you created and add more actions to the sequence so that your MIDI binding does more than just toggle play for that clip. | Anywhere in Loopy Pro where an action can be used, a series of actions can be used. There will be a "+" icon you can tap to add more actions. For example, if you MIDI Learn Play/Stop for a clip, you can go into Control Settings and find the MIDI binding you created and add more actions to the sequence so that your MIDI binding does more than just toggle play for that clip. | ||
= Action Timing = | == Action Timing == | ||
To the left of each action is a white circle. Tapping on the circle pops up a panel to set options for when the action is performed. | To the left of each action is a white circle. Tapping on the circle pops up a panel to set options for when the action is performed. | ||
| Line 30: | Line 28: | ||
If the timing is set to Quantization, the action is performed at the next time that the clocks aligns with that quantization setting. If the timing is set to Delay, the action happens after Delay of the specified time and is independent of the clock's position. If the clock is not moving, all quantizations fire immediately! | If the timing is set to Quantization, the action is performed at the next time that the clocks aligns with that quantization setting. If the timing is set to Delay, the action happens after Delay of the specified time and is independent of the clock's position. If the clock is not moving, all quantizations fire immediately! | ||
= Action Timing and Tempo = | === Action Timing and Tempo === | ||
Timing (as of 1.1.17) is always related to musical time/tempo. When the tempo hasn't yet been defined, events | Timing (as of 1.1.17) is always related to musical time/tempo. When the tempo hasn't yet been defined, events with delays or quantization execute immediately. | ||
= After Last/With Last/Next Trigger = | === After Last/With Last/Next Trigger === | ||
The timing options for all but the first action are slightly different from the first action's. | The timing options for all but the first action are slightly different from the first action's. | ||
| Line 44: | Line 42: | ||
'''With Last'''. The action is performed simultaneous with the previous action (with the specified quantization or delay). Use this when you need actions to fire truly simultaneously or for the timing to be precisely based on the previous actions execution time. In some contexts After Last and With Last will seem to be the same, but in some cases it can make a difference. Especially if any action changes something that a subsequent action relies on. | '''With Last'''. The action is performed simultaneous with the previous action (with the specified quantization or delay). Use this when you need actions to fire truly simultaneously or for the timing to be precisely based on the previous actions execution time. In some contexts After Last and With Last will seem to be the same, but in some cases it can make a difference. Especially if any action changes something that a subsequent action relies on. | ||
'''Next Trigger'''. This action is fired the next time that the action sequence is triggered. For example, you might have a button that the first time it is pressed mutes the bass instrument and records clip 1 and on the second press unmutes the guitar, mutes the bass and records clip 2 | '''Next Trigger'''. This action is fired the next time that the action sequence is triggered. For example, you might have a button that the first time it is pressed mutes the bass instrument and records clip 1 and on the second press unmutes the guitar, mutes the bass and records clip 2. | ||
=== Stop Clip Timing === | |||
= Stop Clip Timing = | Most actions execute immediately, stop clip is different in a very useful way. The Stop Clip and Stop Recording actions are not considered complete until the stopped clip is stopped. This is very useful if you want to sequence clip playback. Let's say that you want to have a button or MIDI binding that plays or solos clip 1 for one cycle and then plays or solos clip 2 after clip 1 is finished playing. The easiest way to accomplish it is to have this action sequence: | ||
Most actions execute immediately, stop clip is different in a very useful way. The Stop Clip | |||
* Play Clip 1 | * Play Clip 1 | ||
* Stop Clip 1 set to trigger after last a slight delay - with stop quantization set to loop | * Stop Clip 1 set to trigger after last with a slight delay - with stop quantization set to loop | ||
* Play Clip 2 - with play quantization set to 1 bar (if the clips are a precise number of bars long) or none. | * Play Clip 2 - with play quantization set to 1 bar (if the clips are a precise number of bars long) or none. | ||
The slight delay is needed for the stop action or clip 1 would stop immediately because it is already at the loop boundary. | The slight delay is needed for the stop action or clip 1 would stop immediately because it is already at the loop boundary. | ||
There are other ways to play/solo clips in order but they require you to set the timing. This method will work without needing to know the clip lengths. | There are other ways to play/solo clips in order but they require you to set the timing based on the clip length. This method will work without needing to know the clip lengths. | ||
=== Action Timing Icons === | |||
[[File:loopy_pro_action_icons.jpeg|600px]] | [[File:loopy_pro_action_icons.jpeg|600px]] | ||
| Line 67: | Line 63: | ||
* A circle with an arrow indicates "After Last" | * A circle with an arrow indicates "After Last" | ||
= Helpful Hints = | == Helpful Hints == | ||
Use quantization when timing needs to be precise and even a millisecond or two would make a difference. | Use quantization when timing needs to be precise and even a millisecond or two would make a difference. | ||
'''Delay Plus Quantization'''. You will sometimes need to have a delay before a quantized event to make sure that it fires on the NEXT quantization interval rather than right now as in the ''Stop Clip Timing'' example elsewhere on this page. If the clock is at 0, every quantization amount would trigger. | '''Delay Plus Quantization'''. You will sometimes need to have a delay before a quantized event to make sure that it fires on the NEXT quantization interval rather than right now as in the ''Stop Clip Timing'' example elsewhere on this page. If the clock is at 0, every quantization amount would trigger. For example, if there is a record or play clip action quantized to the master clock (or 1 bar) and it is immediately followed by a stop clip or stop recording action with the same quantization, the stop will happen immediately because the clock will still be at the specified boundary. Using a small delay for the stop action (say an eighth note) ensures that the clock is no longer at the specified boundary and will execute the event at the next appropriate interval.. | ||
'''Dummy Actions'''. If you need to quantize an action after a delay, you may need to create a dummy action that does nothing but delay. If the action itself is a play or stop or record action which has its own quantization settings, set the quantization within that action. If you need to use a "dummy" action to delay, you can add a the Adjust Parameter Clip Action without specifying a target clip or Trigger Widget action without specifying a widget or any action that would do nothing. | '''Dummy Actions'''. If you need to quantize an action after a delay, you may need to create a dummy action that does nothing but delay. If the action itself is a play or stop or record action which has its own quantization settings, set the quantization within that action. If you need to use a "dummy" action to delay, you can add a the Adjust Parameter Clip Action without specifying a target clip or Trigger Widget action without specifying a widget or any action that would do nothing. | ||
== Example Library == | |||
* '''Repeating Actions with a Button and Dial''' - [[MEDIA:EXAMPLE_Repeating_Widget.zip|this project]] demonstrates one way to set up repeating sequences of actions using a button and a stepped dial. | |||
= Related Pages = | = Related Pages = | ||
[[Action List]] | [[Action List]] | ||
[https://loopypro.com/manual/#actions Loopy Pro Manual - Actions Chapter] | [https://loopypro.com/manual/#actions Loopy Pro Manual - Actions Chapter] | ||
Latest revision as of 05:06, 6 January 2025
Loopy Pro's actions can provide control over almost every aspect of Loopy Pro and can be used to create custom behavior. Actions are used by the MIDI Learn/MIDI Binding system, widgets (buttons, sliders, dials, etc), gestures and follow action system to control Loopy Pro.
MIDI Learn
When you MIDI Learn in Loopy Pro, you are creating a MIDI Binding to an action which you can also customize or add to. The bindings and their actions are accessed by the Control Settings panel.
Action Sequences
Anywhere in Loopy Pro where an action can be used, a series of actions can be used. There will be a "+" icon you can tap to add more actions. For example, if you MIDI Learn Play/Stop for a clip, you can go into Control Settings and find the MIDI binding you created and add more actions to the sequence so that your MIDI binding does more than just toggle play for that clip.
Action Timing
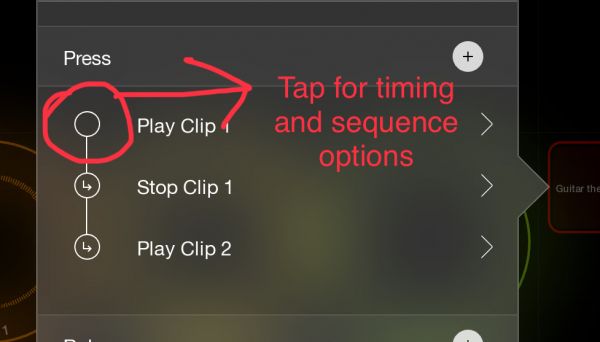
To the left of each action is a white circle. Tapping on the circle pops up a panel to set options for when the action is performed.
By default, the first action happens immediately, and each subsequent action happens one after the other without delay.
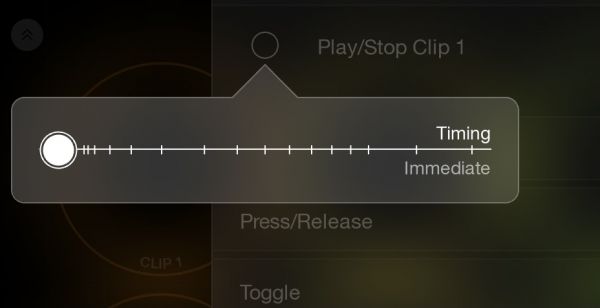
When the timing options panel pops up, it will initially be set to Immediate.
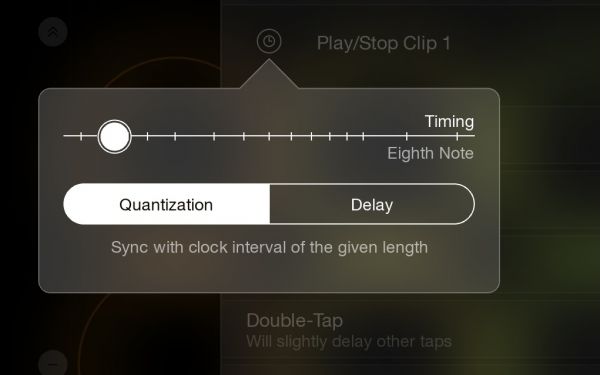
When move the timing slider, the choice of Quantization or Delay will appear.
If the timing is set to Quantization, the action is performed at the next time that the clocks aligns with that quantization setting. If the timing is set to Delay, the action happens after Delay of the specified time and is independent of the clock's position. If the clock is not moving, all quantizations fire immediately!
Action Timing and Tempo
Timing (as of 1.1.17) is always related to musical time/tempo. When the tempo hasn't yet been defined, events with delays or quantization execute immediately.
After Last/With Last/Next Trigger
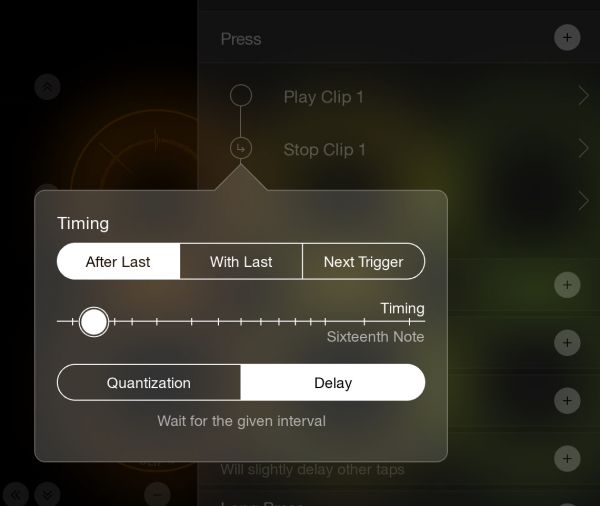
The timing options for all but the first action are slightly different from the first action's.
In addition to the choice of Quantization and Delay, the following options appear: After Last, With Last, Next Trigger. The specified quantization or delay is applied. Most actions take next to no time to execute. Stop clip actions are somewhat different as discussed below.
After Last. The action is performed after the previous action is performed (with the specified quantization or delay).
With Last. The action is performed simultaneous with the previous action (with the specified quantization or delay). Use this when you need actions to fire truly simultaneously or for the timing to be precisely based on the previous actions execution time. In some contexts After Last and With Last will seem to be the same, but in some cases it can make a difference. Especially if any action changes something that a subsequent action relies on.
Next Trigger. This action is fired the next time that the action sequence is triggered. For example, you might have a button that the first time it is pressed mutes the bass instrument and records clip 1 and on the second press unmutes the guitar, mutes the bass and records clip 2.
Stop Clip Timing
Most actions execute immediately, stop clip is different in a very useful way. The Stop Clip and Stop Recording actions are not considered complete until the stopped clip is stopped. This is very useful if you want to sequence clip playback. Let's say that you want to have a button or MIDI binding that plays or solos clip 1 for one cycle and then plays or solos clip 2 after clip 1 is finished playing. The easiest way to accomplish it is to have this action sequence:
- Play Clip 1
- Stop Clip 1 set to trigger after last with a slight delay - with stop quantization set to loop
- Play Clip 2 - with play quantization set to 1 bar (if the clips are a precise number of bars long) or none.
The slight delay is needed for the stop action or clip 1 would stop immediately because it is already at the loop boundary.
There are other ways to play/solo clips in order but they require you to set the timing based on the clip length. This method will work without needing to know the clip lengths.
Action Timing Icons
The circle that appears next to actions indicates the timing/trigger settings.
- An empty circle indicates "With Last"
- A circle with a clock in it indicates "With Last" with delay or quantization
- A circle with a number indicates a "Next Trigger" sequence with the number indicating the trigger number.
- A circle with an arrow indicates "After Last"
Helpful Hints
Use quantization when timing needs to be precise and even a millisecond or two would make a difference.
Delay Plus Quantization. You will sometimes need to have a delay before a quantized event to make sure that it fires on the NEXT quantization interval rather than right now as in the Stop Clip Timing example elsewhere on this page. If the clock is at 0, every quantization amount would trigger. For example, if there is a record or play clip action quantized to the master clock (or 1 bar) and it is immediately followed by a stop clip or stop recording action with the same quantization, the stop will happen immediately because the clock will still be at the specified boundary. Using a small delay for the stop action (say an eighth note) ensures that the clock is no longer at the specified boundary and will execute the event at the next appropriate interval..
Dummy Actions. If you need to quantize an action after a delay, you may need to create a dummy action that does nothing but delay. If the action itself is a play or stop or record action which has its own quantization settings, set the quantization within that action. If you need to use a "dummy" action to delay, you can add a the Adjust Parameter Clip Action without specifying a target clip or Trigger Widget action without specifying a widget or any action that would do nothing.
Example Library
- Repeating Actions with a Button and Dial - this project demonstrates one way to set up repeating sequences of actions using a button and a stepped dial.


