Tech Note: Persistent Send MIDI Widgets: Difference between revisions
(Created page with "= Tech Note: Persistent Send MIDI Widgets = (Current Loopy Pro version when this note was written: 1.1.24) Loopy Pro's slider and non-stepped dial widgets generally get their state from the parameter that they are tied to. They don't actually have a value of their own. If a slider's action is to adjust clip volume or some AUv3 parameter, any changes to those parameter become reflected by the widget.However, if the widget sends MIDI, there is no state for the widget to g...") |
m (→Tech Note: Persistent Send MIDI Widgets: edit for clarity) |
||
| (7 intermediate revisions by the same user not shown) | |||
| Line 2: | Line 2: | ||
(Current Loopy Pro version when this note was written: 1.1.24) | (Current Loopy Pro version when this note was written: 1.1.24) | ||
Loopy Pro's slider and non-stepped dial widgets | Loopy Pro's slider and ''non-stepped'' dial widgets don't have values independent of what they are adjusting. The widget's value (its position) is a reflection of the what the widget controls. If a slider is set to adjust clip volume or some AUv3 parameter, what the slider shows you is the clip volume or value of the AUv3 parameter. It doesn't have a value independent of what it adjusts. | ||
If the widget only sends MIDI, it will continue to show its last value during a session but the value won't be persistent. When you close and reopen the project, the widget will be back at 0 because there isn't anything to get its state from. You can use a stepped dial to work around this behavior since they can be set up to retain their setting between sessions. | |||
If you prefer the look of a slider or non-stepped dial, you can use the stepped dial to send the actual MIDI and a slider or dial whose action is Trigger Widget. You can hide the dial on another page if you would like. | === Basic Setup === | ||
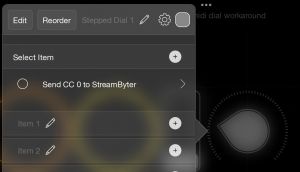
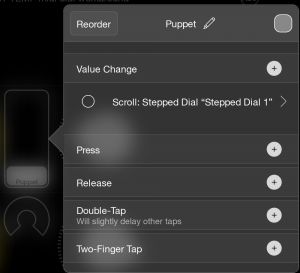
The solution is to use a stepped dial with its State Feedback disabled. When State Feedback is disabled, the dial retains its setting rather than reflecting the setting of what it controls. The State Feedback setting is accessed by tapping on the gear wheel icon in the dial's edit panel.[[File:Stepped Dial Send MIDI.jpg|thumb|none]]If you prefer the look of a slider or non-stepped dial, you can use the stepped dial to send the actual MIDI and a slider or dial whose action is Trigger Widget. You can hide the dial on another page if you would like.[[File:Slider dial setup .jpg|thumb|none]] | |||
=== Setup For Two Way Communication === | |||
The setup discussed in the ''Basic Setup'' above is for one-way communication where you are sending MIDI from Loopy Pro and don't need the widget to be updated from the external device. If the widget is going to receive MIDI from an external device as well as send MIDI back to the device, the setup needs to be a little different. | |||
Let's say that you have a fader on your MIDI hardware that sends CC09 to Loopy Pro when you move it. Sometimes you want to use that hardware knob, and sometimes want to use an on-screen slider or dial in Loopy Pro. In this case, we will MIDI Learn the MIDI CC sent from the external device without setting up any Send MIDI action in Loopy Pro. Loopy Pro's automatic MIDI Feedback to the controller will take care of sending MIDI back to the device when we adjust the onscreen control. | |||
# '''Enable Feedback'''. Make sure that Feedback Enabled is turned on for the external device in Loopy Pro's Control Settings. | |||
# '''Create a 128 step dial'''. Create a Stepped Dial that has 128 steps (the number of MIDI values that can be sent). A quick way to create such a stepped dial is to create a new dial. Tap Select Item +. Choose Send MIDI as the action. Tap on PC. You don't have to select a target. Tap Back. You know have a 128 step dial. Delete the Send MIDI action by swiping left. You will now have a 128 step dial that does nothing. | |||
# '''Disable State Feedback for the dial'''. Tap on the dial's gear wheel and set State Feedback to Disabled. | |||
# '''MIDI Learn'''. Turn on MIDI Learn and tap on the stepped dial. Send MIDI from your external device to Loopy and turn off MIDI Learn. | |||
If you prefer to interact with a slider or non-stepped dial, the steps are ever so slightly different. Perform steps 1-3. Then create the slider or non-stepped dial. Set the slider or non-stepped dial's Value Change action to be Trigger Widget and select the stepped dial you created in step 2. Now, MIDI Learn the slider/non-stepped dial instead of the stepped dial. | |||
That may all sound complicated, but you will find that it is very quick to set up. Once you have set up one control, you can copy/paste to create additional controls. | |||
=== A Note About Send CC Messages in Stepped Dials === | === A Note About Send CC Messages in Stepped Dials === | ||
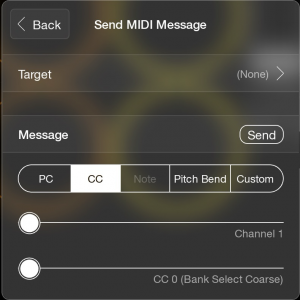
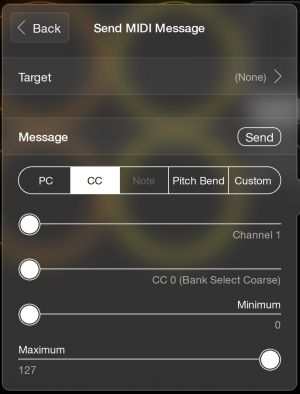
When you create a Send MIDI Message in a stepped dial, the panel sometimes does not display the minimum and maximum value fields. If that is the case, tap on the PC tab and back on the CC tab and the fields will appear. | [[File:Panel-dial-send midi wrong .png|thumb|none]]When you create a Send MIDI Message action in a stepped dial, the panel sometimes does not display the minimum and maximum value fields. If that is the case, tap on the PC tab and back on the CC tab and the fields will appear. [[File:Panel-sendmidicc-ok.jpg|thumb|none]] | ||
[[Category:Tips and Tricks]] | [[Category:Tips and Tricks]] | ||
[[Category:Tech Note]] | [[Category:Tech Note]] | ||
[[Category: MIDI]] | [[Category:MIDI]] | ||
Latest revision as of 03:27, 29 September 2024
Tech Note: Persistent Send MIDI Widgets
(Current Loopy Pro version when this note was written: 1.1.24)
Loopy Pro's slider and non-stepped dial widgets don't have values independent of what they are adjusting. The widget's value (its position) is a reflection of the what the widget controls. If a slider is set to adjust clip volume or some AUv3 parameter, what the slider shows you is the clip volume or value of the AUv3 parameter. It doesn't have a value independent of what it adjusts.
If the widget only sends MIDI, it will continue to show its last value during a session but the value won't be persistent. When you close and reopen the project, the widget will be back at 0 because there isn't anything to get its state from. You can use a stepped dial to work around this behavior since they can be set up to retain their setting between sessions.
Basic Setup
The solution is to use a stepped dial with its State Feedback disabled. When State Feedback is disabled, the dial retains its setting rather than reflecting the setting of what it controls. The State Feedback setting is accessed by tapping on the gear wheel icon in the dial's edit panel.

If you prefer the look of a slider or non-stepped dial, you can use the stepped dial to send the actual MIDI and a slider or dial whose action is Trigger Widget. You can hide the dial on another page if you would like.

Setup For Two Way Communication
The setup discussed in the Basic Setup above is for one-way communication where you are sending MIDI from Loopy Pro and don't need the widget to be updated from the external device. If the widget is going to receive MIDI from an external device as well as send MIDI back to the device, the setup needs to be a little different.
Let's say that you have a fader on your MIDI hardware that sends CC09 to Loopy Pro when you move it. Sometimes you want to use that hardware knob, and sometimes want to use an on-screen slider or dial in Loopy Pro. In this case, we will MIDI Learn the MIDI CC sent from the external device without setting up any Send MIDI action in Loopy Pro. Loopy Pro's automatic MIDI Feedback to the controller will take care of sending MIDI back to the device when we adjust the onscreen control.
- Enable Feedback. Make sure that Feedback Enabled is turned on for the external device in Loopy Pro's Control Settings.
- Create a 128 step dial. Create a Stepped Dial that has 128 steps (the number of MIDI values that can be sent). A quick way to create such a stepped dial is to create a new dial. Tap Select Item +. Choose Send MIDI as the action. Tap on PC. You don't have to select a target. Tap Back. You know have a 128 step dial. Delete the Send MIDI action by swiping left. You will now have a 128 step dial that does nothing.
- Disable State Feedback for the dial. Tap on the dial's gear wheel and set State Feedback to Disabled.
- MIDI Learn. Turn on MIDI Learn and tap on the stepped dial. Send MIDI from your external device to Loopy and turn off MIDI Learn.
If you prefer to interact with a slider or non-stepped dial, the steps are ever so slightly different. Perform steps 1-3. Then create the slider or non-stepped dial. Set the slider or non-stepped dial's Value Change action to be Trigger Widget and select the stepped dial you created in step 2. Now, MIDI Learn the slider/non-stepped dial instead of the stepped dial.
That may all sound complicated, but you will find that it is very quick to set up. Once you have set up one control, you can copy/paste to create additional controls.
A Note About Send CC Messages in Stepped Dials

When you create a Send MIDI Message action in a stepped dial, the panel sometimes does not display the minimum and maximum value fields. If that is the case, tap on the PC tab and back on the CC tab and the fields will appear.
