Troubleshooting MIDI: Difference between revisions
mNo edit summary |
m (Michael moved page MIDI Troubleshooting to Troubleshooting MIDI) |
(No difference)
| |
Revision as of 17:10, 13 June 2024
Loopy Pro's MIDI Learn is generally straightforward and transparent. If you run into problems, the information on this page should help you solve the problem and, if not, it should provide you with the details needed for Loopy Pro support or other users to resolve your problem.
If you have not yet seen it, you main want to see the page Getting Started With MIDI Learn.
Here is a video showing how MIDI Learn should work.
If MIDI Learn isn't working at all, start with the Basic Troubleshooting Procedure below.
If MIDI Learn is "kind of" working jump down to the MIDI Learn section further down the page.
The three most common problems people run into are:
- Controller not sending On/Off on press/release. Loopy Pro expects a controller to send an "on" message on a button/key press and an "off" message on button/key release. If your controller is not set up to do that, Loopy Pro will likely guess wrong about what the intended trigger is. It might choose Hold instead of On. This issue can generally be solved by manually setting the trigger to "On" in the binding or by configuring the MIDI device to send On on press and Off on release.. (See the section MIDI Learn below)
- Controller Feedback. By default Loopy Pro sends feedback back to a controller so that it can update its LEDs. If Loopy or your controller act unpredictably when the controller sends a message try turning off feedback to the device in Loopy Pro's Control Settings panel.
- On/Hold/Double-Tap mapped to the same event. Loopy Pro can map different actions to On, Hold and Double-Tap but some care needs to be taken when setting them up. Hold and Double-Tap triggers have a Defer Other Actions option in the trigger setup. If this option is not turned on, Loopy Pro will immediately process the On as soon as it comes in. So, on a Hold, for instance, the On is processed and then the Hold is activated. If you turn on Defer Other Actions, Loopy Pro will wait to act until it knows whether the the On is part of a hold or double-tap. This will result in a slight delay but ensures that On is not falsely triggered. In some cases, Loopy Pro can correct for the misfire, but in some cases that is not possible.
Basic Troubleshooting Procedure
If you aren't sure where to start, start with this procedure. The outline is
- Reboot your device.
- Use a standalone MIDI Monitor to see if your iPad or iPhone is seeing MIDI from the controller.
- If MIDI is seen, make a note of what messages (and on what channels), your controller is sending
- MIDI Learn triggering a clip in a new project made from Loopy Pro's default document.
- If strange things happen when you send a MIDI message you mapped, turn off the Feedback Enabled for the controller in Loopy Pro's Control Settings
Use A MIDI Monitor to See if MIDI Is Received
Before troubleshooting:
- Fully shut down your device using "Slide to power off" rather than putting it to sleep at waking it up.
- Disconnect everything connected to your device.
- Power the device up and log-in.
- Re-connect your peripherals.
- Proceed as described below.
Use a standalone MIDI Monitor such as ShowMIDI (which can also be loaded as an AUv3), MIDI Wrench, MIDI Scope, or any of the other MIDI Monitors that can run standalone. ShowMIDI is convenient because it runs as both and AU and a standalone app and it gives you a picture the recent activity (as opposed to the long type monitors that can sometimes show an overwhelming amount of data).
When you launch the monitor, check to make sure that your MIDI Device is listed. If your controller is connected to an audio/MIDI or MIDI interface with a standard MIDI cable, the MIDI will come from the MIDI port of the interface.
If your device is not listed, the OS does not see it. Loopy Pro will see any device seen by the OS. If the device isn't seen, you should check your connections and make sure that it is receiving enough power. You may want to contact the MIDI/audio interface manufacturer to ensure that it is compatible with iOS. Check to see if there is a firmware update for the interface.
If the interface is listed, press a button on your controller and make note of what is being sent. If no message is received, check your cables and confirm that the interface or controller is compatible with iOS.
If the controller is connected via USB, make sure that you have supplied enough power. Some controllers require more power than the iPad or iPhone supply. Some require more power than the Apple Camera Adapter plus Apple USB charger supplies.
MIDI Learn
If you have confirmed that your device is receiving MIDI, the next step is to see what happens when you MIDI Learn from the device.
Here is a video showing how MIDI Learn should work. If something different happens, make note of what happens differently as that will point the direction to how to solve the problem.
To troubleshoot after confirming that MIDI is being received from your controller:
- Launch Loopy Pro
- Create a new document using Loopy Pro's default document
- Choose Clip Settings from the main menu
- Scroll to the bottom of the settings panel and choose Restore Defaults
- In Control Settings, turn off any Global Profiles that are enabled. This step is to ensure there is not some conflict with MIDI bindings that might be interfering.
- Turn on MIDI Learn mode
- Tap on the upper-left clip
- Tap or press the button or key or pad on your controller that you want to trigger the clip.
At the bottom of the MIDI Learn Panel, you should see the name/type of event followed by the word ON. If you see anything other than ON, read the rest of this section. If everything seems to have worked correctly till this point, skip to the next section.
Loopy Pro's MIDI Learn assumes that the MIDI controller sends an ON message (MIDI note on or a MIDI CC with a value of 127) when a controller pedal or key is pressed and an OFF message when the pad or key is released.
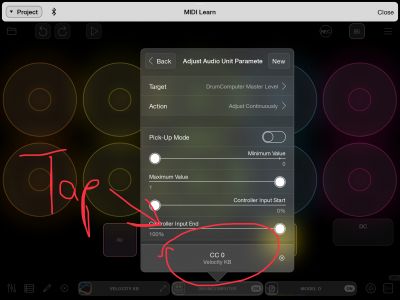
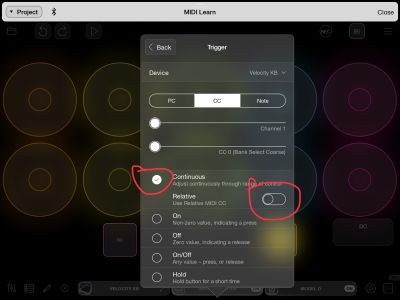
HOLD rather than ON learned. Some controllers only send an ON message and no release/off message. If this is the case, Loopy Pro will see that as a HOLD message. You can tell Loopy Pro to use ON instead of hold. Hold messages will result in delayed response. To change HOLD to ON, tap on the part of the MIDI Learn panel that displays the learned message. You will see options for the triggering event, choose ON. If your controller is configurable, set it to send an ON when pressed and OFF when released.
MIDI Feedback
If you get surprising response when controlling Loopy via MIDI, the problem may be an inadvertent feedback loop, or the controller may not respond well to the feedback that Loopy Pro sends.
By default, Loopy Pro sends feedback to a controller when Loopy received MIDI that you have mapped to something. For many controllers, this allows them to update their display to reflect Loopy's state. For example, if a pad is mapped to play a clip, the pad will light up with the clip is playing. Some controllers, however, misinterpret the feedback and may send it back to Loopy (creating a feedback loop) OR it might interpret as some sort of button press or bank change.
To see if feedback is the issue, open Loopy's Control Settings panel. Find your MIDI controller in the list of MIDI sources at the top of the panel. Turn off the setting labeled Feedback Enabled and see if that solves things.
If that does not solve your problem, you may want to see if your pedal has a setting to ignore incoming MIDI in case something else is sending MIDI back to your device.
Other Causes of Common Problems
If the troubleshooting procedure didn't identify the problem, perhaps you are encountering one of these common issues:
- Insufficient power supplied to the device. Some MIDI devices require more power than the iPad or iPhone can supply. Some require more than the Apple USB charger supplies. This can be an issue when using Apple's USB Camera Adapter to connect a power-hungry device. When this is the case, you may need to use a higher wattage USB charger than the Apple charger, or you could use a powered hub. When using a powered hub, make sure that it is being provided sufficient power.
- Bad cables or bad connection. If your iPhone/iPad doesn't see your wired MIDI device or the MIDI is intermittent, a bad cable or connector could be the cause.
- Poor quality MIDI adapter. Some cheap 5-pin MIDI to USB connectors don't work well.
- Network MIDI. For reasons that remain mysterious, there are some external MIDI devices that do not work well when Network MIDI is active. By default, Loopy Pro leaves Network MIDI off. Check the setting in Loopy Pro's System Settings to make sure that Network MIDI is off.
More MIDI Troubleshooting Tips
Changing/Correcting A MIDI Learn
If you MIDI Learn and something isn't quite right, tap on the MIDI Learned message to see options you can change.
Using a MIDI Monitor to Examine MIDI
It is sometimes useful to be able to see the MIDI coming in from controllers or that is being sent from between plugins or widgets. A MIDI Monitoring AUv3 is very handy. Some useful (and free) MIDI Monitor AUv3 are:
- Show MIDI - ShowMIDI is a non-logging style MIDI monitor that shows current activity. Because it doesn't log data, it let's you focus on what is happening know without having to wade through a large list of messages. You may also want a logging style MIDI monitor (all the others below are logging style) plug-in.
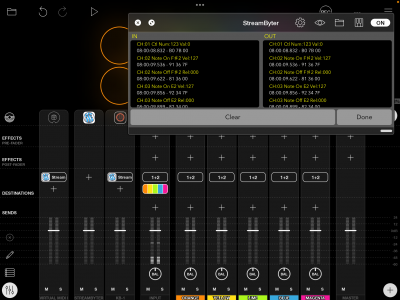
- Streambyter - Streambyter is a free iOS MIDI-processing plugin that also has a MIDI monitor built-in. As a MIDI processor Streambyter might be intimidating, but the MIDI Monitor works well and can be used without knowing about StreamByter.
- mfxMonitor is a free MIDI monitor from Streambyter's developer
- MIDI Tools includes a MIDI Monitor
To use the MIDI Monitor:
- Display Loopy Pro's Mixer in extended view
- Tap the + sign to add a mixer channel
- Choose Add MIDI
- Choose the MIDI Monitor
- Choose Add MIDI to add your source device or Virtual MIDI (to spy on the traffic coming into Loopy Pro's virtual MIDI port)
- Tap on the + sign in the Destination cell for the device you want to monitor and choose the MIDI Monitor you used earlier.
Open the MIDI Monitor's window and you can watch the MIDI traffic.
Streambyter Note. If you are new to Streambyter, tap on the button with the magnifying glass icon to see its MIDI monitor.
Quick tutorial showing StreamByter as a MIDI Monitor in Loopy:
Check Your MIDI Bindings
If MIDI events are resulting in unexpected behavior and you have turned off MIDI Feedback, look at all of your MIDI Bindings. MIDI Bindings are the mapping of MIDI events to actions. They are listed and can be edited through the Control Settings panel.
If a particular MIDI event is causing a problem, make a note of what the event is. If you aren't sure, use a MIDI monitor (as described elsewhere on this page) to see what MIDI message is resulting in the unexpected behavior.
- Choose Control Settings to display the panel.
- Look inside each listed profile.
- The MIDI messages that are bound to action are listed in the profiles.
- Find the MIDI message and tap on it to view the details of the actions bound to it.
- Look through all the profiles in case the same message is mapped in multiple profiles.
More....
What is your pedal sending? The Loopy Pro's MIDI Learn assumes that a pedal sends a value when pressed and another value when released. If your pedal does not send a CC value of 127 (or note velocity of 127) when pressed and 0 when released, it may throw off what Loopy Pro thinks you are trying to do. Loopy Pro allows you to specify the correct trigger if it makes the wrong guess about what the trigger is. You may want to use a MIDI Monitor to see what your pedal is sending. Using a MIDI Monitor is covered elsewhere on this page.
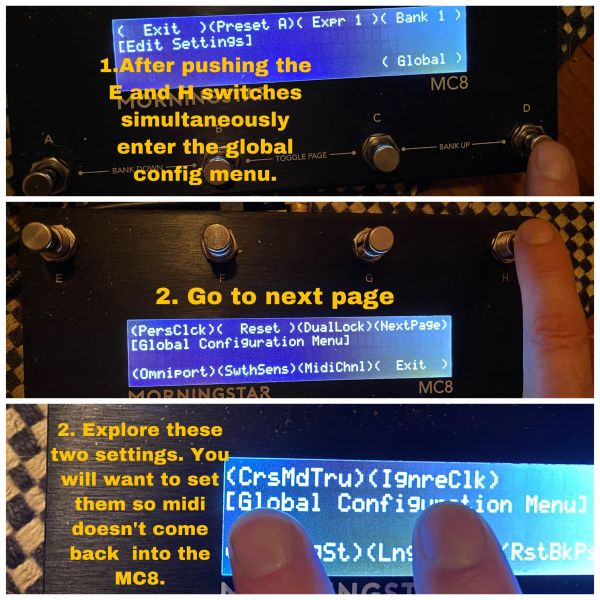
For the Morningstar pedals, use the pedal's global configuration menu to turn Cross MIDI Thru Off and Ignore MIDI Clock On.
Here's a helpful video for the Morningstar pedal from John Paul Music UK
MIDI Controlled Effects Not Responding
If you have an AUv3 such as a sampler that responds to MIDI and which is not responding, you may need to turn off idling for that effect. Normally, Loopy puts effects that aren't receiving any audio input to sleep in order to free up CPU. This is called idling. To turn off idling, open the AUv3 window. Long-press on the label that says On, Off, or Idle and turn off Enable Idle Mode in the panel that pops up.


