Widget Tips and Tricks
This article covers tips, tricks and recipes for making the most of Loopy Pro's widgets.
Value Change Plus Trigger
Periodically people ask "How can I set up a slider or dial so that when it gets turned all the way down, it turns off the related effect or instrument?" To do this:
Overview
- Set up a continuous control widget (a regular dial or slider) to control the desired parameter (such as reverb mix or reverb time) with its value change gesture as usual.
- Set up a stepped dial or radio button that turns the effect off and on.
- Add a trigger widget action to the continuous control widget to scroll the off/on control.
Detailed Steps
- Create a continuous control widget.
- Add a non-stepped dial or slider to your layout.
- Edit the widget and add a parameter adjustment action to the Value Change section of the widget.
- Create and on/off control.
- Add a stepped dial or radio button group to the layout with two steps or buttons. If you want this control to be hidden, put it on a different page from the continuous control widget.
- Label the first step or button Off. Add the action that turns the effect or instrument off.
- Label the second step or button On. Add the action needed to turn the effect or instrument on.
- Add an action to the continuous control widget that scrolls the on/off widget.
- Because Value Change actions are expected to be continuous actions and on/off type actions are impulse actions, we need to use a little trick: adding a trigger widget action as the continuous controller's press action then moving it to the Value Change section.
- Open the edit window for the continuous control widget.
- Tap on the + next to the Press label.
- Add a Trigger Widget action and choose the On/Off widget as the target.
- Tap Action in the Trigger Widget action setup and choose Scroll. You will see something like the following:
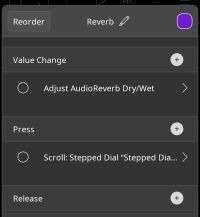
- Tap Reorder and drag the Scroll action into the Value Change section
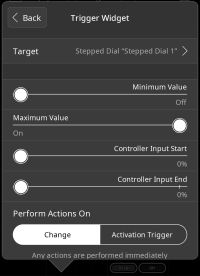
- Tap on the Scroll action to edit it.
- Edit the Controller Input End value by long-pressing it. Enter a very small number like 0.1. After you edit it, you may see 0% as the value. That's ok.


Now, when you drag slider or knob to 0, the effect or instrument will be turned off. As soon as you increase the value, the effect or instrument will turn on.
Other uses! You can adapt this technique to other uses besides triggering on/off behavior. You can also use multi-stepped dials and radio buttons so that you can trigger other behaviors when you change a slider or dial's values.
Another Method for Triggering Actions from Faders
Another method of triggering discrete actions when a fader or non-stepped knob passes through certain values, is to add a Send MIDI Message action to the Value Change section and sending it to a plugin such as Streambyter or an unused MIDI color as a passthrough to Loopy Pro's MIDI Control system then setting up a MIDI binding to the sent message. Program Change commands are especially handy for this application.