Troubleshooting Audio Problems
As of iOS/iPadOS 17.5, the OS itself manages the connection to audio interfaces and apps have little influence. In most cases, when there are problems with an audio device connection the issue is system-wide and out of the control of individual apps.
The information in this article is intended to help you get connected.
Note: Logic Pro on iPadOS has access to non-public APIs and offers connection choices when multiple interfaces are connected that other apps do not have.
The way that iOS/iPadOS works, there can be only one audio input and one audio output device at a time. The OS automatically makes the last connected device the designated input and/or output device. If a device is input only or output only, it will take over whichever function it provides. Headphones with mics are input+output devices as far as the OS is concerned. Headphone dongles -- even if no headphones are attached MAY look to the OS like an output device. Some USB hubs have built-in headphone ports. These may or may not conflict with an audio interface unless the interface is connected after the system has booted.
Bluetooth Note: if your interface is something like a SparkGo that can connect via USB or Bluetooth, use USB. Bluetooth audio (not MIDI) connections generally have too much latency for realtime music performance. Besides the latency, such devices may perform unpredictably with Loopy Pro when running in Bluetooth mode.
First Troubleshooting
Preparation
These steps may seem superfluous, but rebooting and reconnecting solves a surprisingly large number of issues.
As a test project, we highly recommend that you use Loopy Pro's default project with no plugins loaded in order to ensure that there aren't complicating factors.
- Prepare a simple test project. OPTION 1: If you have a Loopy Pro project that has audio in it, you are set. OPTION 2: If you don't have a project with audio in it, disconnect your device and make a recording in Loopy Pro using the built-in mic. Save the project. You will use it later to check playback.
- Fully shut down your device using "Slide to power off" rather than putting it to sleep at waking it up.
- Disconnect everything connected to your device.
- Power-cycle the peripherals. Turn off all the peripherals that will be connected and turn them back on.
- Power the device up and log-in.
- Re-connect your peripherals.
Checking the available output devices
Use the system's Control Center to see what output devices the OS sees. The details may vary slightly on some versions of the OS. If these don't work, find out how to display Control Center on your device by searching on the web.
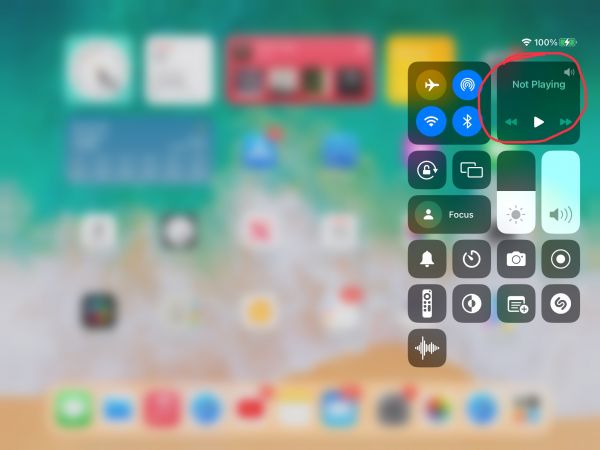
- Swipe down from the upper-right corner to display the Control Center.
- On most devices, the upper-right tile will be for sound output. Tap it.

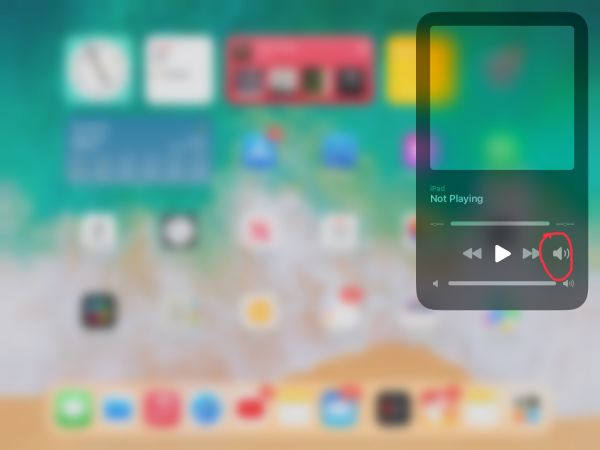
- Tap on the Speaker icon (circled in the picture below) to see a list of the possible output devices. Take a screenshot if you will need further troubleshooting help.

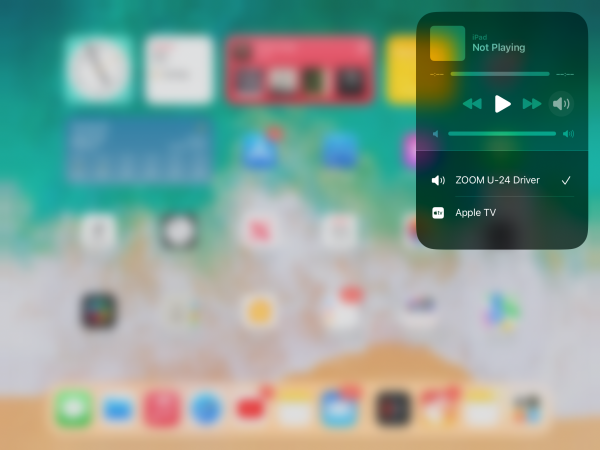
- You should see something like the picture below that shows the names of the possible audio outputs.

If your device does not appear in the list, see the Common Issues section below.
If your device does appear:
- Launch Loopy Pro
- Open the project that you created in the Preparation step.
- Try playing the project.
If you don't hear the audio:
- Make sure the volume is turned up on your device using its volume buttons.
- Check in Loopy's mixer to see if levels show on the Master channel when playing back.
- If the audio is not working right, choose System Settings from Loopy's main menu and try a different sample rate or buffer size. Try playback again and try another sample rate or buffer size and repeat to try the available options.
- Make sure that Multiroute Audio is off by choosing System Settings from Loopy's main menu.
- Open Loopy Pro's mixer.
- Tap on the plus sign to add a hardware input channel. Take a screenshot of the options that appear.
- When the hardware input channel is added, tap on the icon at the top of the channel and take a screenshot.
If audio still does not work, launch Apple's Music app and see if the audio plays back correctly.
If you have any other audio apps or hosts, check to see if output from them works. When you contact us (see below), let us know whether you tried other apps and if they did or did not work. Please let us know the app names.
If the audio plays back correctly from Apple Music but not Loopy Pro, send diagnostics to Loopy Pro support by following the directions here. Also, send us any screenshots made during the troubleshooting procedure as well as information about your audio interface and any other connected peripherals.
When you have finished this procedure: if this did not solve your problem, send the following information to support at atastypixel.com:
- Did your interface appear in Control Center as an output option?
- After selecting, your interface as an output option, was Loopy Pro's output heard through your device?
- Is Apple's Music app or Garageband able to play audio through your interface?
- Did you try different sample rates and buffer sizes?
- Is Loopy Pro able to record from your device?
Common Issues
The most common issues are:
- Something has gone wonky. A lot of connection problems are solved by disconnecting all peripherals, rebooting and reconnecting.
- A bad cable. A lot of connection issues are the result of a cable not working properly.
- The audio interface isn't being supplied enough power. Even if the interface's lights come on, it may not have enough power to operate correctly. When this is the case, the solution partly depends on what type of iPad or iPhone you have. If using a device with a lightning connector, make sure that you are using the Apple USB adapter that includes a lightning port as well. The adapter's lightning port should be connected to a power supply. Depending on the interface, the Apple USB charger should be sufficient. In some cases, you may need a higher-wattage USB charger. You can also use a sufficiently-powered powered USB hub.
- The audio interface is not class-compliant. iOS/iPadOS devices (as of 17.3) generally require that the interface be class-compliant. While the OS technically has opened the possibility of custom drivers, there are currently no audio interfaces with custom iOS drivers.
- The audio interface firmware needs updating. This is not terribly common, but is sometimes the issue.
- More than one audio output or input device is connected. Some MIDI peripherals with USB connections look to the OS like an audio interface. Make sure that your audio interface gets plugged in after your MIDI peripheral. You will not be able to use the audio capabilities of both your interface and another peripheral that looks to the OS like an interface at the same time and there is no easy way to switch between them other than plugging/unplugging.
Volume Calibration
When using an audio interface, you may find that the input or output volume is not what you expect. This generally is an indication that the audio interface input and our output gain needs adjusting.
Output Level
0 db output from Loopy Pro is the maximum level that an iOS device can output without distorting. If the Loopy Pro mixer volume is at 0 dB, and you feel that the volume needs to be louder, you need to increase the volume from your interface or mixer to your speakers. The volume calibration project below can be used to calibrate your system
Volume calibration project. This Test Tool project can be useful in calibrating the output of your iPad or iPhone. It has two loops that send maximum or near maximum volume. Turn down your amplifier or mixer before playing the output as the project's files are potentially loud.
Input Level
When recording from external inputs, you generally want to avoid the meter going into the red (over 0 dB), and you don't want the input too quiet. Generally, start with Loopy Pro's mixer at the default 0dB fader setting. At this setting, the incoming volume is unchanged by Loopy Pro. When possible, use your audio interface/mixer to adjust the level to be close to what you want and use the Loopy Pro mixer fader to make slight adjustments.
Depending on your audio interface, there may be Hardware Gain that you can adjust in the input settings panel that you get by tapping on the input's icon in Loopy Pro's mixer.