Tips And Tricks (Assorted): Difference between revisions
(update a few outdated items) |
Wim-number37 (talk | contribs) m (Fixed broken internal link to Resampling_Setup page.) |
||
| (One intermediate revision by the same user not shown) | |||
| Line 21: | Line 21: | ||
|} | |} | ||
'''Recording (Resampling) Within Loopy Pro ''' - To record the output of clips to other clips, add a color or colors as destinations for the color you want to record from. See [[ | '''Recording (Resampling) Within Loopy Pro ''' - To record the output of clips to other clips, add a color or colors as destinations for the color you want to record from. See [[Resampling_Setup|Resampling Setup]]. | ||
'''Use the Loopy AU to as library of elements you commonly use. ''' If you find that you would like a library of elements that you frequently use in your projects, you can stash them in a Loopy AUv3 project. Whenever you need to add any of those elements, you can add a Loopy AU instance, load your 'library project' and copy and paste from it. TIP: use pages to organize the elements into related groups. For example, I have a library project with one page for retrospective looper related buttons, another page for buttons that remote control an IAA drum app I use frequently, etc. To do this, save your library project into the "Audio Unit Extensions Folder" in Loopy's project manager. | '''Use the Loopy AU to as library of elements you commonly use. ''' If you find that you would like a library of elements that you frequently use in your projects, you can stash them in a Loopy AUv3 project. Whenever you need to add any of those elements, you can add a Loopy AU instance, load your 'library project' and copy and paste from it. TIP: use pages to organize the elements into related groups. For example, I have a library project with one page for retrospective looper related buttons, another page for buttons that remote control an IAA drum app I use frequently, etc. To do this, save your library project into the "Audio Unit Extensions Folder" in Loopy's project manager. | ||
Latest revision as of 15:17, 5 August 2024
Tips and Tricks
Here are some handy tips for using Loopy Pro. If you are having a problems, see Troubleshooting.
Multiple Paths For An Input - Demonstration of how to send the same input to different colors/tracks, each with its own effect chain. This demonstration shows how to set it up to hear the tracks/inputs wet but record them dry.
MIDI Map AU Effect Parameters. See the article MIDI_Map_AUv3_Parameters and this short video.
Getting MIDI into Midi Control from Inside Loopy - The MIDI Learn/MIDI Bindings system listens to external MIDI Devices and virtual MIDI ports and can also receive input from any AUv3 that sends MIDI. If you want to send MIDI from widgets or Follow Actions to trigger MIDI bindings, use a MIDI AUv3 as a go-between. Streambyter is a convenient, free AUv3 that pass through all MIDI it receives. You can use the Send MIDI action to send MIDI to the Streambyter AUv3 and use that MIDI to trigger MIDI bindings.
Loopy AU: Set host tempo from the Loopy AU - if you are using the Loopy AU and want to set the host tempo from your first recorded loop, use these steps. Turn Ableton Link on in both the Loopy AU and the host. In the Loopy AU, turn off host sync.
One Loop Playing Per Color - There are a few ways to ensure that only loopy of a color play at a time.
- Groups - You can do this with a play group by adding all loops of a color to the same play group.
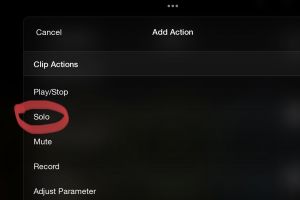
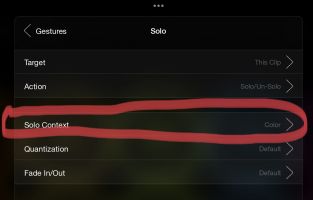
- Solo Action Gesture (Context: Color) - You can use the Solo action with the color context instead of groups. This lets you use groups for other purposes. To do this, set up a gesture to use the Solo action and set its context to Color. You can set this up globally or for particular colors. Make sure that solo context is set to color (other contexts are group and all clips) as shown in the picture below. This means that within the clip's color only the targeted clip will play -- without affecting loops of other colors. You could use this as part of the default tap gesture, but you may want to use a different gesture.
 |
 |
| Action setup for restricting play to one loop per color | |
Recording (Resampling) Within Loopy Pro - To record the output of clips to other clips, add a color or colors as destinations for the color you want to record from. See Resampling Setup.
Use the Loopy AU to as library of elements you commonly use. If you find that you would like a library of elements that you frequently use in your projects, you can stash them in a Loopy AUv3 project. Whenever you need to add any of those elements, you can add a Loopy AU instance, load your 'library project' and copy and paste from it. TIP: use pages to organize the elements into related groups. For example, I have a library project with one page for retrospective looper related buttons, another page for buttons that remote control an IAA drum app I use frequently, etc. To do this, save your library project into the "Audio Unit Extensions Folder" in Loopy's project manager.
Reset the phase start point with actions. The Phase Align Clock action can reset Loopy Pro's clock while it is running..
Use widgets as "macros" for reusable sets of actions. If you have sets of actions that you use together in more than one place (let's say multiple follow actions or MIDI Control actions), set up a button widget to perform them (you can even put the widget on a different page so that it doesn't take up important space). Then wherever you want to trigger that sequence of actions, use a trigger widget action.
Typing numerical values. To set a precise numerical value for a slider, long press on slider's value display (not its label).
Launchpad: creating pads for widgets. If you want your Loopy layout's button widgets to show up on a Launchpad in session mode, turn on Loopy's MIDI Learn. Tap on the widget you want triggered by the launchpad. Tap the Launchpad pad that should trigger the pad. The pad will take on the widget's color and trigger the widget when pressed.